")


How to Build an Ecommerce Store | US Business Steup Guide (STEP-BY-STEP)
Starting a business can feel overwhelming, especially when legal, financial, and administrative requirements vary by country and state. Without a clear process, it’s easy to miss critical steps, overpay for services, or set up a structure that limits growth later. This guide breaks down how to set up a business step by step, focusing on practical actions rather than theory. Whether you are launching your first company or formalizing an existing idea, the goal is to help you move from concept to a legally compliant, operational business with confidence and clarity.
STEP 1: Choose a Business Structure
The most common options are Sole Proprietorship, LLC, C-Corp, and S-Corp.
For most founders, an LLC is the best starting point because it is simple, flexible, and provides liability protection.
Choose C-Corp only if you plan to raise venture capital.
STEP 2: Choose the State to Register
If you live in the US, register in your home state.
If you are a non-US founder running an online business, Wyoming or Delaware are common choices.
Registering in the wrong state can create unnecessary fees and filings.
STEP 3: Choose a Business Name
Your business name must be unique in the state.
Check availability in the state registry, domain availability, and basic trademark conflicts.
Avoid restricted words like “Bank” or “Insurance” unless licensed.
STEP 4: Register the Business
File Articles of Organization with the state.
Appoint a registered agent.
Save your formation certificate and filed documents.
STEP 5: Get an EIN (Employer Identification Number)
An EIN is required to open a bank account and file taxes.
Apply directly with the IRS.
The EIN is free and issued immediately online.
STEP 6: Create an Operating Agreement
This document defines ownership, profit distribution, and decision-making.
It is required by banks and protects your liability status.
Even single-member LLCs need one.
STEP 7: Open a Business Bank Account
Keep business and personal finances separate.
Use your EIN and formation documents.
All income and expenses must flow through this account.
STEP 8: Register for Taxes
Register for federal taxes using your EIN.
Register for state sales tax only if required.
Confirm tax nexus rules before collecting any sales tax.
STEP 9: Set Up Bookkeeping
Use accounting software or a structured spreadsheet.
Track income, expenses, and receipts weekly.
Do not wait until tax season to organize finances.
STEP 10: Get Required Licenses and Permits
Some businesses require federal, state, or local licenses.
Examples include sales tax permits, professional licenses, or industry-specific permits.
Confirm requirements before selling.
STEP 11: Prepare Legal Documents
Create client or customer agreements.
Publish refund, privacy, and terms of service policies.
Put all payment and data rules in writing.
STEP 12: Get Business Insurance
Common coverage includes general liability, professional liability, product liability, and cyber insurance.
Choose coverage based on your business risk.
Increase coverage as revenue grows.
STEP 13: Set Up Payments
Enable credit card, ACH, or invoicing systems.
Configure tax calculation where required.
Test all payments before launch.
STEP 14: Launch and Monitor
Launch with one clear offer and one primary marketing channel.
Track leads, conversions, cash flow, and profit.
Adjust pricing, messaging, or channels based on results.
Website Setup Guide: Building a Professional eCommerce Store With OpenCart
Step 1: Define your website’s purpose before building
Before installing anything, be clear on what the website must achieve.
Ask:
-
Are you selling physical products, digital products, or services?
-
Do you need payments immediately or lead generation first?
-
Is this a local, national, or international store?
Action:
Write one sentence:
“This website exists to help ___ buy ___ with ___.”
This prevents unnecessary features later.
Step 2: Choose the right hosting environment for OpenCart
OpenCart is self-hosted, which gives you full control and ownership.
Minimum hosting requirements:
-
PHP 8+
-
MySQL or MariaDB
-
SSL certificate
-
SSD storage
-
Good server-side caching
Action:
-
Choose a host optimized for PHP applications
-
Enable SSL before installation
-
Avoid shared hosting with heavy limitations
A stable host directly affects speed, security, and SEO.
Step 3: Install OpenCart correctly
You can install OpenCart in three main ways:
-
One-click installer (cPanel / hosting dashboard)
-
Manual upload via FTP
-
Cloud deployment (if supported by your provider)
Best practice:
-
Use the latest stable version
-
Install on the root domain (not a subfolder unless intentional)
Action after install:
-
Delete the
/installdirectory -
Rename the
/adminfolder for security
Step 4: Configure core store settings
This is where many stores fail by rushing.
Key areas to configure properly:
-
Store name, logo, and contact details
-
Currency and tax location
-
Weight and length units
-
Maintenance mode (during setup)
Action:
Complete every field under System → Settings before adding products.
Step 5: Choose a clean, fast OpenCart theme
Your theme affects:
-
User experience
-
Mobile performance
-
Conversion rates
What to prioritize:
-
Mobile responsiveness
-
Clean category navigation
-
Fast loading speed
-
Compatibility with latest OpenCart version
Avoid:
-
Bloated themes with unnecessary animations
-
Poorly supported third-party templates
Action:
Install one theme only. Test it fully before adding extensions.
Step 6: Structure your products and categories correctly
Good structure improves SEO, usability, and scalability.
Best practices:
-
Logical category hierarchy (no more than 3 levels deep)
-
Clear product names (no internal codes)
-
Unique descriptions per product
-
High-quality images with consistent sizing
Action:
Create categories first → then add products.
Step 7: Install only essential OpenCart extensions
OpenCart’s strength is its modular extension system, but restraint matters.
Essential extension categories:
-
Payments (cards, wallets, local methods)
-
Shipping (flat rate, real-time carriers)
-
SEO enhancements
-
Security and backups
Rule:
If an extension doesn’t directly support sales, compliance, or efficiency skip it.
Step 8: Configure payments and checkout properly
Checkout friction kills conversions.
Best practices:
-
Offer at least one card payment method
-
Keep checkout steps minimal
-
Show total costs early (taxes + shipping)
-
Enable guest checkout
Action:
Run a full test order from product page → payment → confirmation email.
Step 9: Set up SEO fundamentals in OpenCart
OpenCart is SEO-friendly when configured correctly.
Core SEO setup:
-
Enable SEO URLs
-
Write unique meta titles and descriptions
-
Use clean category and product URLs
-
Set up sitemap and robots.txt
Action:
Install an SEO extension only if you need advanced control.
Step 10: Secure the OpenCart website
Security is not optional for eCommerce.
Minimum requirements:
-
SSL enabled sitewide
-
Strong admin passwords
-
Limited admin user access
-
Regular backups
Action:
Schedule automatic backups and test restoring one.
Step 11: Configure emails, taxes, and compliance
Before launch, confirm:
-
Order emails send correctly
-
Contact forms work
-
Tax rules are accurate
-
Privacy and refund policies are visible
Action:
Place a real test order using a real email address.
Step 12: Prepare for launch and post-launch checks
Launching is not the finish line.
Pre-launch checklist:
-
Mobile testing
-
Page speed testing
-
Broken link check
-
Checkout tested
-
Contact details visible
Post-launch priorities:
-
Monitor abandoned carts
-
Track conversions
-
Collect customer feedback
-
Improve one thing per week
How to Use the Language Editor in OpenCart 3.x
The language editor in OpenCart 3.x lets you change storefront and admin text without touching core files. This matters when you need quick wording fixes, clearer labels, or local phrasing while keeping upgrades safe. Below is a practical, step-by-step guide that shows where to click, what to edit, and how to avoid common mistakes.
Accessing the language editor in the admin panel
Log in to your OpenCart admin area. From the left menu, go to Design → Language Editor.
This page is where all editable text strings live.
You will see filters at the top. Use them to narrow results:
-
Route: targets a specific page or feature (for example,
checkout/checkout). -
Key: the internal language key (useful if you know it).
-
Value: the visible text shown to users (best for quick searches).
Tip: If you are fixing a single phrase, search by Value first. It is faster and avoids guessing keys.
Finding the exact text you want to change
OpenCart loads language strings by route. If you cannot find a phrase immediately, check which page it appears on.
A simple method:
-
Open the page on your storefront or admin.
-
Note the URL path or function (for example, product page, checkout, login).
-
Use that path in the Route filter.
This approach keeps edits precise and prevents accidental changes elsewhere.
Editing language values safely
Once you find the correct entry:
-
Click Edit.
-
Change only the Value field.
-
Save.
OpenCart stores this as a language override. The original file remains untouched, so updates will not overwrite your changes.
Good practice:
-
Keep wording short and clear.
-
Match the tone used across the rest of the site.
-
Avoid adding HTML unless necessary.
Adding a new language override
If a phrase does not exist yet, you can create one manually.
-
Click Add New.
-
Enter the Route where the text is used.
-
Enter the Key (must match how OpenCart references it).
-
Add your custom Value.
-
Save and test the page.
This is useful when extensions introduce text that needs refinement or localization.
Clearing cache and checking results
After edits, go to Dashboard → Developer Settings and refresh the theme and language cache.
Then reload the page you edited.
If the change does not appear:
-
Confirm the correct route.
-
Check that you edited the active language.
-
Make sure caching is cleared.
When to use the language editor and when not to
Use the language editor for:
-
Renaming buttons and labels
-
Improving checkout wording
-
Fixing grammar or tone
-
Adjusting admin text for staff clarity
Avoid it for:
-
Large translations (use full language packs)
-
Logic-based changes (those belong in controllers or templates)
How to Setup Your Footer Information Pages in OpenCart 3.x
Footer information pages help customers find essential details—policies, company info, and contact guidance without cluttering your main navigation. In OpenCart 3.x, this setup takes only a few minutes if you follow the steps below.
Step 1: Create your information pages
Go to Catalog → Information → Add New.
For each page (for example, About Us, Privacy Policy, Terms & Conditions):
-
Enter a clear Title
-
Add concise, plain-language Description
-
Set Status to Enabled
Save each page before moving on.
Step 2: Assign pages to the footer
Still inside each information page:
-
Set Bottom to Yes
This tells OpenCart to display the page link in the footer.
Optional: Use Sort Order to control the link order from left to right.
Step 3: Check the footer module
Navigate to Extensions → Extensions → Modules and confirm Information is installed and enabled.
If needed:
-
Edit the module
-
Ensure it is assigned to the Footer position
-
Save changes
Step 4: Refresh cache and verify
Go to Dashboard → Developer Settings and refresh theme and cache.
Visit your storefront and scroll to the footer to confirm links appear correctly.
Common footer pages to include
-
About Us
-
Privacy Policy
-
Terms & Conditions
-
Delivery Information
-
Contact Us
Keep copy short and direct. Footer pages work best when they answer questions quickly.
How to Set up SEO URLs in OpenCart 3.x
SEO URLs make your store links readable for people and search engines. Instead of long parameter-based URLs, OpenCart can generate clean paths that clearly describe products, categories, and pages. In OpenCart 3.x, the setup is straightforward if you follow the steps in order.
Step 1: Enable SEO URLs in admin
Go to System → Settings → Edit your store → Server.
Find Use SEO URLs and set it to Yes.
Save changes.
This tells OpenCart to generate clean URLs across the storefront.
Step 2: Rename and enable the .htaccess file
Using FTP or your hosting file manager:
-
Locate the root OpenCart directory.
-
Rename
htaccess.txtto.htaccess. -
Confirm the file is readable by the server.
Without this step, SEO URLs will not work, even if enabled in admin.
Step 3: Check server requirements
SEO URLs rely on URL rewriting.
Make sure:
-
Apache has mod_rewrite enabled, or
-
Nginx rewrite rules are correctly configured
Most shared hosting plans support this by default. If links return 404 errors, this is the first thing to verify.
Step 4: Add SEO keywords to products and categories
SEO URLs only work when keywords are defined.
For each item:
-
Categories: Catalog → Categories → Edit → SEO tab
-
Products: Catalog → Products → Edit → SEO tab
-
Information pages: Catalog → Information → SEO tab
Enter a unique, lowercase keyword using hyphens.
Example: mens-running-shoes
Do not reuse the same keyword across multiple pages.
Step 5: Avoid duplicate and conflicting URLs
Each SEO keyword must be unique across the entire store.
Good practice:
-
Use singular, descriptive phrases
-
Keep URLs short and readable
-
Avoid stop words unless they add clarity
Conflicts cause pages to load incorrectly or not at all.
Step 6: Clear cache and test links
Go to Dashboard → Developer Settings and refresh theme and modification cache.
Then:
-
Click category and product links
-
Confirm URLs load without errors
-
Check both desktop and mobile views
Common issues and quick fixes
-
404 errors: Check
.htaccessand rewrite rules -
Links not changing: Confirm SEO URLs are enabled and keywords saved
-
Duplicate URL warnings: Edit keywords to make them unique
Why OpenCart is ideal for serious businesses
OpenCart is ideal when you want:
-
Full ownership of your store
-
No forced transaction fees
-
Scalability without platform lock-in
-
A global extension ecosystem
It’s built for businesses that want control, flexibility, and long-term growth, not quick shortcuts.
How to Configure Payments, Shipping, and Taxes in OpenCart
Part 1: How to Configure Payment Methods in OpenCart
Step 1: Access payment settings
From the OpenCart admin panel:
-
Go to Extensions → Extensions
-
Select Payments from the dropdown
This is where all payment gateways are managed.
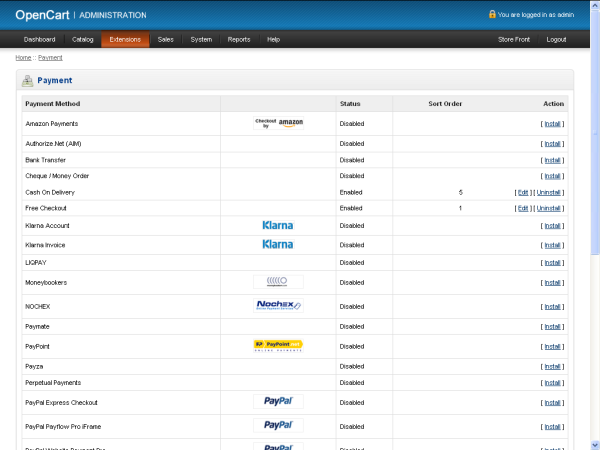
Step 2: Choose the right payment methods
At minimum, most stores should support:
-
Credit / debit cards
-
One alternative method (wallet, bank transfer, or local payment)
Best practice:
-
Start with 1–2 reliable gateways
-
Avoid installing too many options early (it hurts conversion)
Step 3: Install and enable a payment extension
For each payment method:
-
Click Install
-
Click Edit
-
Enter required credentials (API keys, merchant ID, secret key)
-
Set:
-
Order status (e.g. Processing, Paid)
-
Geo zone (limit by country if needed)
-
Status: Enabled
-
Sort order (controls checkout display order)
-
Action:
Always place a real test order before launch.
Step 4: Test checkout end-to-end
Before going live:
-
Add product to cart
-
Complete checkout
-
Confirm:
-
Payment succeeds
-
Order appears in admin
-
Confirmation email is sent
-
If this step fails, do not launch.
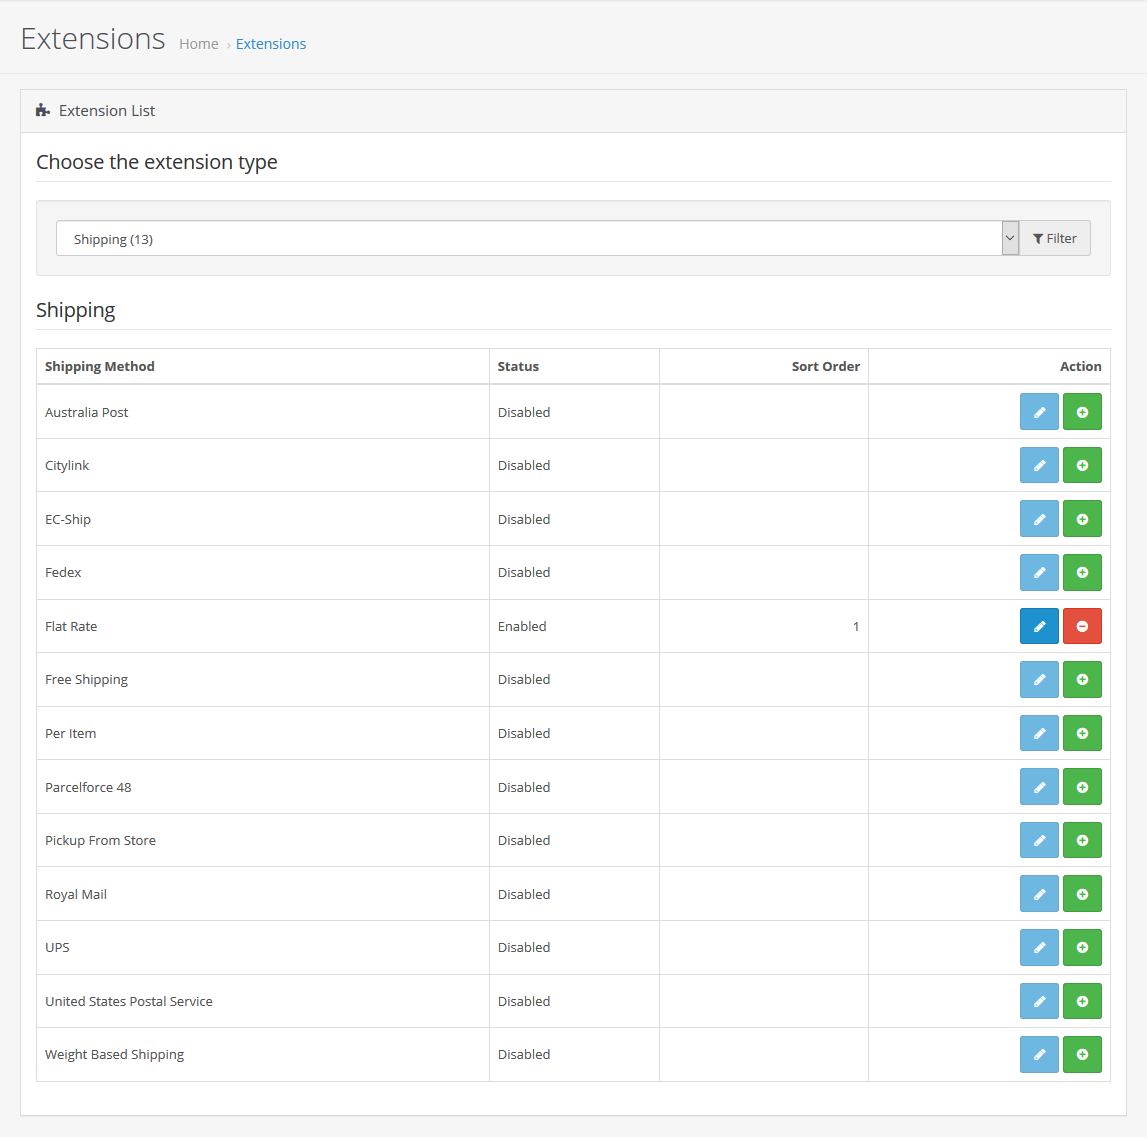
Part 2: How to Configure Shipping Methods in OpenCart
Step 1: Define your shipping strategy first
Before touching settings, decide:
-
Flat rate or variable pricing?
-
Domestic only or international?
-
Real-time carrier rates or manual rates?
This prevents rework later.
Step 2: Access shipping extensions
-
Go to Extensions → Extensions
-
Select Shipping from the dropdown
OpenCart supports both simple and advanced shipping logic.
Step 3: Enable basic shipping methods
Common options include:
-
Flat Rate
-
Free Shipping
-
Weight-based shipping
-
Real-time carriers (via extensions)
For each method:
-
Click Install
-
Click Edit
-
Set:
-
Cost
-
Tax class (important)
-
Geo zone
-
Status: Enabled
-
Tip:
Start simple. Complex shipping rules increase checkout abandonment.
Step 4: Configure product weight and dimensions
Shipping calculations rely on accurate product data.
For each product:
-
Set weight
-
Set length, width, height
-
Assign correct weight class
Missing data leads to incorrect shipping quotes.
Step 5: Test shipping logic
Test:
-
Different cart values
-
Different customer locations
-
Edge cases (free shipping thresholds)
Action:
Test shipping the same way a customer would.
Part 3: How to Configure Taxes in OpenCart
Step 1: Understand OpenCart’s tax structure
Taxes in OpenCart work in three layers:
-
Tax Rates
-
Tax Rules
-
Tax Classes
All three must be configured correctly.
Step 2: Create tax rates
-
Go to System → Localisation → Taxes → Tax Rates
-
Add a tax rate:
-
Name (e.g. US Sales Tax, VAT)
-
Rate (%)
-
Geo zone
-
Priority
-
Rule:
Only configure taxes you are legally required to collect.
Step 3: Create tax rules
-
Go to System → Localisation → Taxes → Tax Rules
-
Link:
-
Tax rate
-
Customer group
-
Priority
-
Tax rules control when a tax applies.
Step 4: Assign tax classes
-
Go to System → Localisation → Taxes → Tax Classes
-
Create classes such as:
-
Taxable Goods
-
Digital Products
-
Shipping Tax
-
Then assign:
-
Tax class to products
-
Tax class to shipping methods
This step is commonly missed and causes incorrect totals.
Step 5: Enable tax display settings
-
Go to System → Settings
-
Set:
-
Prices with tax / without tax
-
Display tax in cart and checkout
-
Action:
Match display rules with local legal requirements.
Final Pre-Launch Checklist (Payments, Shipping, Taxes)
Before launch, confirm:
-
✅ Payment gateways process real transactions
-
✅ Shipping costs calculate correctly
-
✅ Taxes apply only where required
-
✅ Order totals are accurate
-
✅ Confirmation emails work
Why this matters in OpenCart
OpenCart gives you full control, but that also means configuration accuracy is your responsibility. Proper payment, shipping, and tax setup directly affects:
-
Conversion rates
-
Legal compliance
-
Customer trust
-
Refund and dispute rates
Email & Analytics Integration Plan for OpenCart
Part 1: Define the purpose of email and analytics before integration
Before installing anything, clarify what success looks like.
Email should help you:
-
Confirm orders and payments
-
Recover abandoned carts
-
Retain customers
-
Drive repeat purchases
Analytics should help you:
-
Understand traffic sources
-
Track conversions and revenue
-
Identify drop-offs in checkout
-
Make data-driven improvements
Action:
Write this internally:
“We are tracking data to improve ___ and emailing customers to achieve ___.”
Part 2: Set up transactional email correctly (foundation layer)
Step 1: Configure OpenCart’s core email settings
Transactional emails are sent by OpenCart itself.
Go to:
-
System → Settings → Mail
Configure:
-
Mail engine (SMTP is strongly recommended)
-
Sender email and name
-
Authentication details
-
Email protocol security (TLS/SSL)
Best practice:
-
Use a dedicated domain email (e.g. orders@yourdomain.com)
-
Avoid free email providers for store emails
Step 2: Test all default system emails
Before adding marketing tools, confirm:
-
Order confirmation emails send
-
Status update emails work
-
Contact form emails arrive
Action:
Place a test order and verify email delivery and formatting.
Part 3: Integrate email marketing (customer communication layer)
Step 3: Decide what emails you actually need
Avoid over-emailing. Start with essentials.
High-impact email flows:
-
Order confirmation (mandatory)
-
Shipping / delivery updates
-
Abandoned cart reminders
-
Post-purchase follow-ups
Promotional campaigns come later.
Step 4: Choose an email integration approach
In OpenCart, email marketing is typically added via:
-
Native extensions
-
API-based integrations
-
Data sync via customer and order exports
What to look for in an email extension:
-
Customer sync
-
Order-based triggers
-
GDPR-compliant opt-in handling
-
Automation support
Rule:
If it doesn’t integrate with orders and customers, it’s not useful for eCommerce.
Step 5: Connect customer and order data
Once integrated:
-
Sync customer email addresses
-
Sync order history
-
Tag customers based on purchase behavior
This enables:
-
Targeted campaigns
-
Segmentation
-
Revenue-based reporting
Action:
Verify that new customers and orders appear in your email platform.
Part 4: Integrate analytics (measurement layer)
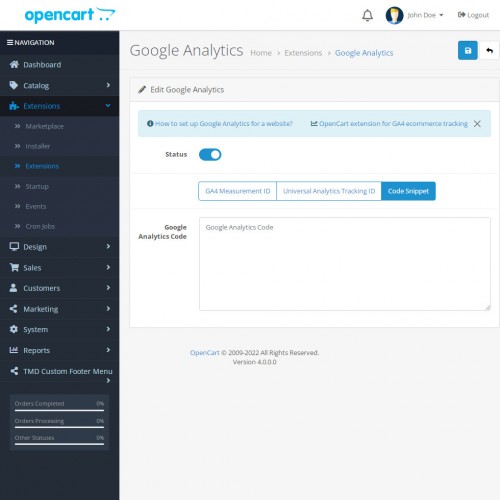
Step 6: Enable analytics tracking in OpenCart
Analytics should be active from day one.
Go to:
-
Extensions → Extensions → Analytics
Enable:
-
One analytics method only (to avoid duplicate data)
Action:
Confirm the tracking ID is correctly added sitewide.
Step 7: Configure eCommerce tracking
Basic page views are not enough.
Ensure analytics tracks:
-
Product views
-
Add-to-cart events
-
Checkout steps
-
Completed purchases
-
Revenue and tax values
This turns analytics from “traffic stats” into business intelligence.
Step 8: Set up conversion goals and funnels
Define what matters.
Core conversions to track:
-
Completed order
-
Account registration
-
Newsletter signup
Funnels to review:
-
Product → cart → checkout → payment → confirmation
Action:
Identify where customers drop off and why.
Part 5: Connect email and analytics together
Step 9: Attribute revenue to email
Email performance should be measured in revenue, not opens.
Ensure:
-
Email links include tracking parameters
-
Orders from email are visible in analytics
-
Campaigns are tied to conversions
This shows which emails actually make money.
Step 10: Use analytics to improve email strategy
Use analytics insights to:
-
Identify best-selling products to promote
-
Time campaigns around peak traffic
-
Segment customers based on behavior
-
Reduce unnecessary emails
Rule:
If data doesn’t change decisions, you’re tracking the wrong thing.
Part 6: Compliance, privacy, and reliability
Step 11: Handle consent and data properly
Before sending marketing emails:
-
Collect explicit consent
-
Store opt-in status
-
Offer easy unsubscribe options
Make sure:
-
Privacy policy is visible
-
Email practices match stated policy
Step 12: Monitor and maintain integrations
Set a simple review routine.
Weekly:
-
Check email delivery rates
-
Review conversion reports
Monthly:
-
Audit tracking accuracy
-
Clean inactive email subscribers
-
Review top-performing channels
Final Integration Checklist
Before considering this “done”:
-
✅ Transactional emails send reliably
-
✅ Email marketing tool syncs customers and orders
-
✅ Analytics tracks full checkout and revenue
-
✅ Email campaigns show revenue attribution
-
✅ Privacy and consent are compliant
Why this approach works with OpenCart
OpenCart gives you full ownership of data, which means:
-
No forced ecosystems
-
Flexible integrations
-
Accurate revenue tracking
-
Long-term scalability
When email and analytics are set up correctly, OpenCart becomes not just a store but a measurable, optimizable sales system.